PLEASE NOTE THAT EACH SYMBOL WILL REQUIRE DIFFERENT SETTINGS TO GET THE BEST RESULTS
Default Stock Parameters Included
The default parameters supplied with the trading robot have not been optimized; they have been manually set as an example. You should be able to adjust them to obtain much better results.
The download contains the default example parameters so that you can start trading. You will need to load them into your trading robot. Follow the link below for instructions.
General Settings
The general settings for the trading system consist of the symbol and timeframe that you wish to trade with. The adjustable settings are shown together with explanations.
Symbol Timeframe
With this trading system, changing the timeframe should not make any difference as all the trade entry, exit, and risk management happen on each incoming tick of data, which is every time there is a price change.
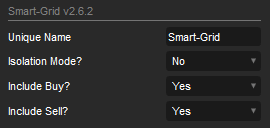
Unique Name
This setting allows you to run multiple symbol instances with different parameter settings independently at the same time.
Isolation Mode
This is a key risk management setting that, when set to YES, prevents other symbol instances from trading and will only open trades for the same cBot symbol instance. An example would be that the drawdown risk of the account is set to 5% for EURUSD, and if another symbol were to open, like EURGBP, also with a 5% drawdown, this would give an accumulated total DD of 10%. If a trader has many symbol instances being traded, then this feature will limit trades to open for a single symbol at any given time, thus keeping the amount of risk in check.
Include Buy & Sell
If you choose No, the robot will exclude all trades in the direction specified. Having them both set to Yes will allow the robot to open both Long and short trades.
Grid Settings
These are the settings for the actual smart grid.
Grid Distance (pips)
This is the distance in pips for the grid. Each time the price retraces (x) pips, a new position is opened in the opposite direction to the trend. It is worth noting that the distance is affected by symbol spread and slippage when the order is filled.
TIP: Set the Grid-Distance more than 2 pips, especially if you are running optimization
What Is the Volume Multiplier & How does Position Sizing work?
The volume multiplier is a setting that controls position sizing, the higher the value the higher the returns, but also the higher the potential risk, each time the price retraces the Grid Distance in pips from the previous same side position it opens a new position and multiplies the volume. We use a special formula to calculate the volume for each trade on a price retracement, which does not follow the conventional method of a normal System; using our special formula, there are other factors taken into consideration.
- The volume of the last position.
- If a position has been lost or won.
- The number of open positions for the trade direction.
- If the open positions are above or below the last entry price.
A formula is applied to all the above values to determine the actual position size of a new trade; this helps reduce losses and increase winners.
- Need more Information? - Read a forum post from a customer
Example
Starting position size is 0.5 lots; the volume multiplier is 1.5, the next position that opens will have a position size of 0.5 x 1.5 = 0.75 lots and the one after that would be 0.75 x 1.5 = 1.12 lots
The volume is reset when a trade loses and only multiplies for winning trades.
Will the position size keep multiplying?
The answer is no. The position size will reset back to the starting volume depending on how many positions are open and the last entry price. Our in-built formula will help reduce losses.
Include lots Limit
If you choose 'YES', a limit will be set on the maximum lot value (position size) that the robot will open. This is to protect your account.
Lot Limit
The is the maximum lot value allowed by the robot when it opens a position using the Lots Exponent value. It defaults to 0.5 and ranges from 0.01 upwards. The decimal values help with smaller account sizes so that a position will never open with a lot size too big for the account. This is very useful for risk management.
Position Sizing
This is a list of settings that allow you to configure your position size.
Type: This allows you to set 4 different types of trade size calculations.
Apart from the fixed lot size, all calculations use the stop loss.
- Fixed lot size, each trade will open with a fixed size in lots.
- Equity, the trade size will be calculated as a % of the account equity.
- Balance, the trade size will be calculated as a % of the account balance.
- Cash, the trade size is calculated as a cash value.
This feature will only apply to the first trade, additional trades are multiplied as per the algorithm.
General Protection
We have added some additional risk control features as requested by existing customers to improve the trading system.

Stop Loss
All our tests were with no stop loss, which still produced a low drawdown of your cash equity. This trading system uses a unique method to close positions: when the DiNapoli Stochastic indicator feels that the instrument is oversold or overbought, it closes the position.
If you plan to run the robot with no stop loss, then keep an eye on the losing positions. The smart grid system will only open positions in the direction of the trend, so the odds are in your favour that it will continue this way. You can always experiment with the optimal stop loss with optimization.
Max Spread (pips)
This is the maximum spread allowed for a symbol before the robot stops opening positions; this is very useful if you have a small grid distance value and when the spread is very high due to low liquidity.
Max Slippage (pips)
This is known as the market range in cTrader. Slippage refers to the difference between the expected price of a trade and the price at which the trade is actually executed. If the slippage is equal to or above the maximum value set in the robot, no trade will open.
Max Losing (buy)
This is the number of Long positions open that are losing, an example would be that the maximum allowed value is 3 then if all 3 positions are losing and in the red, no additional BUY trades are allowed to open until at least one of them goes into profit and is green. This feature is for the cBot instance symbol and not all open positions created by the cBot, so if the symbol was EURUSD and 3 positions were losing, the robot will not open any more BUY EURUSD positions. Still, it will continue to open SELL positions.
Max Losing (sell)
This is the number of Short positions open that are losing, an example would be that the maximum allowed value is 3 then if all 3 positions are losing and in the red, no additional SELL trades are allowed to open until at least one of them goes into profit and is green. This feature is for the cBot instance symbol and not all open positions created by the cBot, so if the symbol was EURUSD and 3 positions were losing, the robot will not open any more SELL EURUSD positions. Still, it will continue to open BUY positions.
The max-losing buys and sells feature was requested by traders because at the end of a trend cycle, if the system has paused trading due to maximum-losing trades, it can continue trading in the opposite direction and gain profits to cover the losses.
Max Trades Open
This is the number of positions that are allowed to open at any given time for the symbol you are trading. This will help limit any risk and prevent the robot from opening many unwanted trades. Please note that this is not for all open trades for all symbols but only for the cBot instance symbol being traded.
To reduce risk, it is best to have the max trades open between 1-10 max.
Take Profit
The robot has a few options for taking a fixed or automatic profit; the automatic take profit is explained above in the section about position sizing.
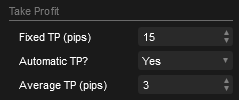
Fixed TP (pips)
To use the fixed take profit, you will need to set the Automatic Take Profit to No. The robot's default settings are to use an automatic take profit that is controlled by the core logic.
Automatic TP
If you set this value to No, it will use the value you set for the standard fixed Take Profit and will not be dynamically repositioned constantly.
Average TP
This is the average take profit when you select Yes to include the use of the Automatic take profit feature above. Experiment with different values to get the optimal setting for your symbol.
Price Level Stop
Price levels are very important, as you may wish to set them where you feel a trend may end, like at a strong support or resistance level. With these settings, you can stop the robot from trading and also close all open positions, locking in profits.
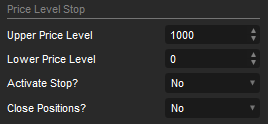
Upper Price Level
This is the upper price at which the robot will stop or close all trades when the symbol bid price reaches it. The default value is 1000 to prevent the robot from stopping at the start.
Lower Price Level
This is the lower price at which the robot will stop or close all trades when the symbol bid price reaches it. The default value is 0 to prevent the robot from stopping at the start.
Activate Stop?
When the upper or lower price levels are reached, this option will stop the cBot instance.
Close Positions?
When the symbol bid price reaches the upper or lower price level, you can close all open positions.
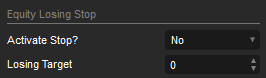
Equity Losing Stop
This feature is very useful to prevent you from blowing your account if the system starts to lose too much. You set the value to the amount that you want the cBot instance to stop and close all positions when your account equity, including all open losing positions, drops to the value you have set.
Example
Equity stop is set at 500. As soon as your account equity reaches or drops below 500, the robot will stop, and all open positions will close. Account equity includes all open trades in negative or positive balance.
Activate Stop?
This activates or deactivates the feature that will hard stop the cBot instance for the symbol traded only.
Losing Target
This is the equity-losing target, so when your equity drops below this value, all open trades will close, and the cBot will stop.
Example
The balance stop is set at 1000. As soon as the balance of your account is above or reaches 1000, the robot stops, and all open positions will close. There may be open positions with a negative value that will cause a loss, causing the final balance to be lower than the pre-set balance stop value.
Equity Profit Stop
This feature will stop the cBot instance for the symbol being traded and close all open positions so that the account's end balance matches the equity target value.
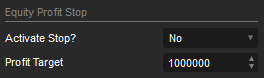
Activate Stop?
This activates or deactivates the feature that will hard stop the cBot instance for the symbol traded only.
Profit Target
This is the equity profit target. When your equity reaches this value, all open trades will close, and the cBot will stop.
Equity = balance - unrealised Net loss profit + Net profit plus any bonus.
Balance Losing Stop
This feature will stop the cBot instance for the traded symbol and close all open positions when the account balance drops below a set value.
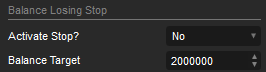
Activate Stop?
This activates or deactivates the feature that will hard stop the cBot instance for the symbol traded only.
Balance Target
This is the balance-losing target, so when your account balance reaches this value, all open trades will close, and the cBot will stop.
Drawdown Stop
This feature will stop trading, stop the robot and close all open positions when your account balance drops below a set percentage %; this protects your account should the markets go against your trades due to high-volatile market events and where the automated system is trading for you while you are not managing them.
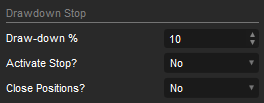
Draw-down %
The % value of your account balance before the robot hard-stops and closes all your winning and losing positions.
- Account balance £1000
- 5% Drawdown stop
- When all open trades, both winning and losing, cause a 5% of balance drawdown or £50
- The robot stops, and all open trades close
- The final balance is £950
Activate Stop?
This will stop the cBot instance if set to YES.
Close Positions?
This setting will close all open positions, if the activate stop setting above is set to NO, then the system will close all open trades, but continue trading and opening new positions.
Trading Hours
You can specify the hours and trading sessions when the robot will trade; this helps avoid periods of unpredictable market activity; follow the link below for more information. This uses your local PC time, but if you run a backtest, it uses the server time UC+0
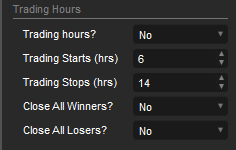
Trading Starts (hrs)
You can only enter whole numbers from 1 to 23.
Trading Stops (hrs)
You can only enter whole numbers from 1 to 23.
Friday Stop
This feature will stop the robot from opening new positions at a set time on a Friday and close all open positions (x) minutes after the robot pauses; this is to allow new trades some breathing space to gain some profit before being closed. This uses your local PC time, but if you run a backtest, it uses the server time UC+0.
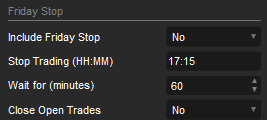
Stop Trading
This is the time in hours and minutes to tell the trading robot to stop opening new positions. The format must be hours: minutes, so 16:30 for 4:30 p.m.
Wait for (minutes)
This is the number of minutes in whole numbers before the Close Open Trades feature closes the trades.
Close Open Trades
If this setting is selected as YES, then the trading system will wait (x) minutes after the Friday stop time before closing any open trades.
Trailing Stop Loss
A trailing stop is a useful feature. The take profit target will trigger when the position gains (x) pips and also trail behind the price by (x) pips. If the price retraces too far, it closes the position and locks in your profit.
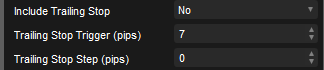
Trailing Stop Trigger
This is the value in pips when the trailing stop is activated.
Trailing Stop Step
The value in pips that the take profit target will follow behind the symbol price.
Break-Even Stop Loss
A break-even stop-loss feature will move your stop loss to a price where there is no longer any financial risk when the position is in profit and winning; there is also an option to add extra pips to gain a locked-in profit.

Trigger (Pips)
This is the value in pips when the break-even is activated.
Extra (Pips)
This is the value in pips that the stop loss will move to lock in profits.
Forex News Release Manager
We have included this product for free to allow you to avoid trading during high-impact news events; for more information on configuring the NRM product, please follow the link below.
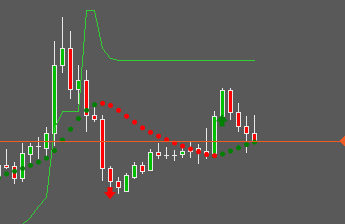
DiNapoli Stochastic Indicator
This version of the DiNapoli Stochastic has a smoother indicator and extra logic to match the curve of the lines to identify possible price reversal that matches a sharp price reversal. This oscillator smoothing method filters out "noise" in the price movement. It is used in strategies that are oriented to a standard stochastic. The stronger smoothing can lead to the loss of an array of signals. It is recommended to apply any trend indicator for more efficient use of the indicator and its signal filtering.
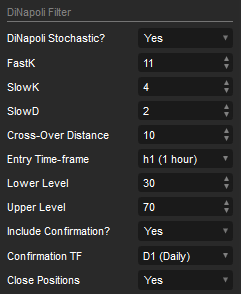
Include?
You can decide whether to include this trend indicator. If you select no, then it will be the old-school grid hedge with possible large drawdowns.
Fast K, Slow K, Slow D
Cross-Over Distance
This is the distance between the signal and the result line when the signal line crosses above or below the result line, which identifies a trend reversal.
Entry Time-frame
This is the indicator's main entry timeframe, and it will signal bullish or bearish trend signals based on this timeframe.
Upper Level
The signal line must be above the upper level if the indicator signals a bearish trend.
Lower Level
The signal line must be below the lower level if the indicator signals a bullish trend.
Include Confirmation?
This is an additional timeframe that can be used with the entry timeframe to create a stronger trend signal. If you have the right settings, you will achieve a lower drawdown but also a lower profit. It can be used for non-aggressive trading. Only use this if you are experienced with the settings.
It may be worth noting that the DiNapoli indicator has logic that we do not openly disclose to traders, so how it actually works is hidden. It will provide trend signals starting from the first cross-over until the opposite side crosses over.
Confirmation Time-frame
This is the confirmation entry timeframe for the indicator, and based on this timeframe, it will signal bullish or bearish trend signals.
Close Positions
This is a key feature that helps reduce run-away trades when the trend reverses. If you set this to YES, if there are any BUY trades open when the DiNapoli changes from bullish to bearish, then all the buy trades will close.
It helps protect your account when a market cycle changes and trades are open against the new trend.
Average True Range Indicator
The cTrader average true range (ATR) is a technical analysis indicator that measures market volatility by analysing the complete range of an instrument's price for the selected period. It was introduced by market technician J. Welles Wilder.
This setting is an added filter that, if selected, will only allow trades to open when the WAE indicator identifies a buy or sell opportunity and the average true range price is below the symbol price for a buy signal and above the symbol price for a sell signal.
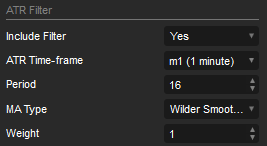
ATR Time-frame
This allows the use of any timeframe for the ATR indicator. The chart can be one minute, but the ATR indicator can be calculated within a one-hour timeframe.
Please note that the best setting is 1 minute, and when you create a new cBot instance, the timeframe defaults to 1 hour.
Period
This is the number of periods used for the calculation; the default value commonly used is 6.
MA Type
There are 8 different moving average types to use, including the hull.
Weight
This is the indicator's weight calculation.
Hull Moving Average Indicator
This indicator is very good at identifying trend direction. Created by Alan Hull, this type of moving average is extremely fast, helps eliminate lag, and improves smoothing.
If this is used with the DiNapoli indicator, it works better with a lower entry timeframe—10 minutes is good.
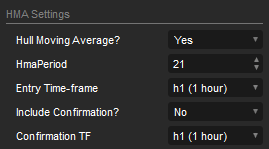
HmaPeriod
This is the number of periods used for the calculation; the default value commonly used is 21.
Entry Timeframe
This is the first entry timeframe to use. One hour seems to be the optimal value, but experiment with other timeframes depending on the symbol used.
Include Confirmation
This is the secondary confirmation timeframe which is optional, this offers multi-timeframe indicator confirmation for the trend.
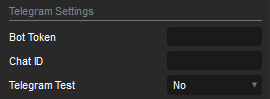
Telegram Settings
This automated trading system benefits from using instant Telegram messages directly to a mobile phone, web browser or PC desktop.
Help Finding Bot Token & Chat ID
To help you set up your alerts, we provide the Telegram Testing Tool, which will help you configure your email and Telegram settings.
Telegram Test
If the Telegram Test setting is set to YES, it will send a message every time the cBot starts. This is a good way of checking that the messaging service is working.
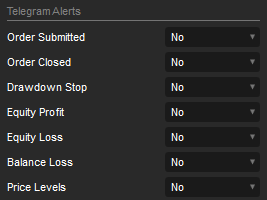
Telegram Alerts
When any of the following events occurs, useful information is sent to a mobile phone in the following instant messages. All alert events can be turned on or off.
- Order submitted
- Order Closed
- Drawdown stop
- Equity profit
- Equity loss
- Balance loss
- Price levels