As algorithmic trading becomes more and more popular amongst traders, the important thing to understand is that the absolute key is to know how the automatic trading system we are going to use works. The same thing as in manual trading – we need to know are exact rules of any strategy to use it wisely, and know its possibilities.
Author: Lukasz Budny. ClickAlgo Customer with extensive knowledge of cBot optimisation using the Neptune trading system.
Introduction
Many people who are new in algo trading start to pursue their dreams of fast getting rich after they saw some impressive results from someone else. Someone who is already experienced in these and knows what he is doing very well. The path to success is never short or easy, also in algo trading – so you shouldn’t think that using someone else settings will work well for you too all the time, much better idea is to understand how to optimise the cBots yourself to give best results according to your needs.
One of the most popular mistakes that new, fascinated algo traders do is to aim at very advanced ATS (automated trading system) at first – like Grid-Hedge or Switchback. These two are very complex systems, they are more like a playground to automate your idea, and test strategies and require months of backtesting before you will get something really promising, especially since they give so many possibilities to trade that it is simply not possible to find one best setting just like that.
A much better idea is to start your algo trading journey with Neptune bots and this is what this article is about – to help you understand how it works, how to optimise it in a wise way to save your time, protect you from some over-optimisation struggles and make things simple and fun.
What Exactly is The Neptune cBot?
Neptune is an automatic trading system made by ClickAlgo that uses a pack of best-performing indicators for the current pair to open and manage trades. And it's one of its strengths – each bot is a separate system, using dedicated built-in indicators to measure the trend, direction, volume etc. Because of that, it's not all around – and this is a good thing because like in manual trading – some people are very good at trading on EURUSD but just average or even poor on others. Same on Neptune – dedicated one could perform amazing on EURUSD but could make a constant loss if you try to use it on some other pairs. What would you prefer – have something amazing in a dedicated environment or just average on anything?
Important
Neptune is fully black-boxed, which means you don’t know what indicators are used. But – the good thing is you don’t even need to know that to make it very good.
Many complex ATS use some advanced logic to boost profits like grid positions (adding new ones when a previously opened one is on the loss) or hedging (opening another one in opposite direction if the trend change). However, if they can make a huge profit this always means that they risk much also – and this can be seen on backtests as usually very high drawdowns. Neptune is very old school in this case – it doesn’t grid, doesn’t hedge, just open position with stop loss, its very trend following, simple as that. You can manage risk very easily and also make it very safe.
Can Neptune be used out of the box?

When you look on the sales page you will notice that it comes with an example settings file that you can just upload and hit Play to let it rip right? Well yes, in theory – but a wise move will be first to understand its setting if it's all new to you, which will give you the opportunity to tune it for your needs. For example – if you don’t want to take a higher risk or you want to trade on a small account, a good idea will be to reduce its turbo count etc.
A wise idea will be using example settings on backtesting, especially on tick data on one year back range – then you can see for yourself how they perform and make a decision if you would let it go all the time on your VPS or drawdown will be too stressful.
An even better idea will be to make the best settings for your needs yourself. Because you might don’t know – but even things like a different broker can matter in terms of performance as their candles can differ a little, and ticks can be different on backtests that would finally make trades opened at different times on your account compared to a person who made these settings. Heck, sometimes even with the same broker account but using different machines in all processes (i.e. make optimisation on home pc and backtest it on VPS) can make results vary.
In short: example settings can be very good for you – but the wise idea would be to backtest them first, then try it for a few weeks on a demo account. And even better – learn how to make your own that will outperform these.
Of course, we all know that past results do not guarantee future ones – but really good settings for the past year on tick data at least could make you much more confident than using random ones and praying for good.
How to Backtest and Optimise Like a Professional
Before we dive into Neptune settings, a very important thing that often is not taken in mind by many traders is to prepare your optimisation tab in cTrader so your workshop as best as possible. It's very important cause it will direct which way optimisation will go and how good results you will get.
Which Timeframe?
Let's get started with adding a Neptune instance to your just installed Neptune cBot (I will use EURUSD as an example one that performs very well). First, pay attention to what timeframe you add your pair to instance – this will be used to all Neptune black-boxed indicators as the main interval:

Using TF lower than H1 is not advised. Personally, after weeks of different backtests I’ve noticed that the best performing TF for Neptunes are H2 and H4. However, the higher the timeframe the lower the trades count will be per year – but what you will prefer: to get less but more stable, won trades or thousand of trades where 50% of them or even more are lost?
Backtest Settings
Moving on to Backtest settings on Optimisation Tab, hidden under the gear icon:
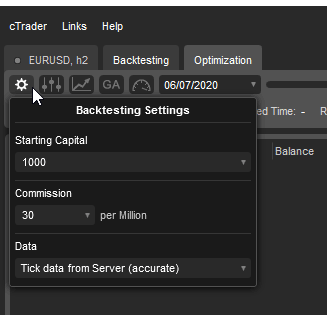
This is a very important place: you have to set the Data field to “Tick data from Server (accurate). This way, you don’t have to set manually fixed spread values and more important – you will get much more precise results. Also, set your Starting Capital to the lowest possible (1000) as it will make comparing results easier.
Tick data requires much more time and a strong machine to perform all backtests. This is caused by much information in every price change by every tick on every candle. You don’t get that info if you select just open prices info – which also is super simplified and doesn’t need many resources to calculate – but you know what? These single ticks that optimisation would not see done on open prices can make your settings act totally different on live results – and yes, in extreme cases it would constantly lose money even if open prices backtests showed settings were amazing. So pay attention to always using tick data if you really want more stable results. Yes, it's worth it even if it took much more time to calculate all backtests (open data optimisation can take a few hours, tick data can take a few days or weeks depending on how strong the CPU you have).
Optimisation Method
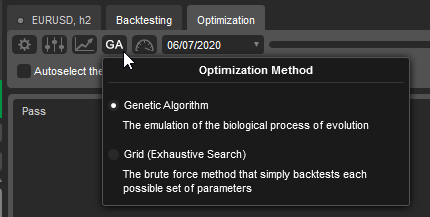
The fourth one is Optimisation Method, nothing to change here from default:
A genetic Algorithm is some kind of smart cTrader technology that forces optimisation to follow the way that it finds optimal for criteria you set before. The grid way is just testing every possible combination of both parameters – and believe me, you don’t want that cause it will take years, especially on tick data. The market will change its cycle a few times before you finish and the best results will be not the best anymore.
Pro-Tip
I noticed that the Genetic way is limited to a number of backtests somehow, so even if you have 64GB of RAM and 12 cores CPU – it will still finish at some point even if it could test more and find something better. That's why setting criteria is so important and not selecting too many parameters to optimise too – but I will mention that soon in the Neptune settings section.
Optimisation Resources
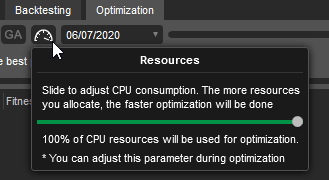
This one speaks for itself, so no magic tricks here – if you are doing optimisation on a dedicated machine or you don’t need your home pc to anything else currently – switch that all way right and feel full power!
Pro-Tip
cTrader is not perfectly good at multi-cores threading and you will notice that even on heavy optimisation it does not always use 100% of CPU load. That is perfectly normal, it's still wise to have a stronger CPU as you can for optimisation on tick data.
Optimisation Date-Ranges
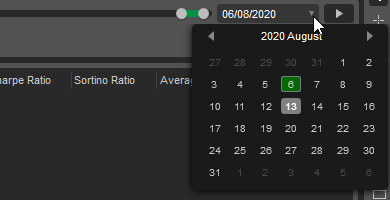
This is also fast and easy: set start and stop of data range for about a full year back. This is enough to cover many different trends in markets and create some stable results.
Pro-Tip
Some say that is wise to use more than just one year back to make bullet-proof settings. Yeah, that could be right, however, it could also even lower trades per year cause of more protective settings then. Personally, I like to think that market moves in cycles that are not typical in duration so it's wise to re-optimise settings just in a simple manner: do it every month, for one full year back.
cBot Parameter Settings
Finally, we are here, on the most important settings that will instruct cTrader on what settings could it check to find optimal ones for your symbol in the current stage of the market. All of these are just my personal preferences of course, but as long as I find them useful you can do optimisation this way and save much of your time figuring it out.
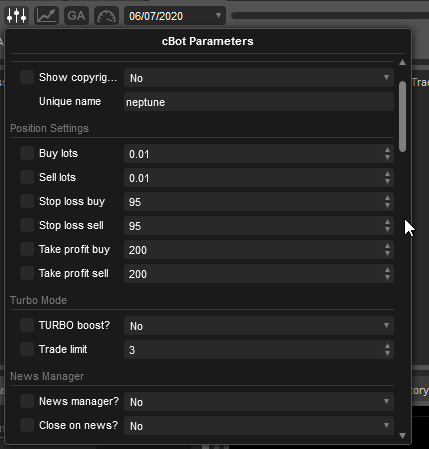
At first, we need to uncheck things that there is no point to optimise and waste time on any non-influence things. So for sure, unselect and make fixed things like:
- Show copyright.
- Unique name: can help you later in open trades to figure it out with trades that were created by exactly this instance of Neptune, also these have to be different if you want to use 2 or more instances of the same Neptune (let's say one for H4 and one hor H2).
- Buy lots/sell lots – in my opinion, a good idea is to start low so make it fixed at 0.01, depending on your account.
- Take profit – I prefer to set it on 200 pips, cause Neptune does not often hit that tp anyway, it often closes trades by trailing stop which is more optimal and safe.
- Turbo-boost – If you select "Yes" the trading system will boost the net profit and the number of trades, this can provide a much higher return on profits, but at the same time it may also increase your risk, we advise that you experiment using different timeframes with this option turned on and off. With turbo boost turned on more than 1 position can open at the same time so you can end up with multiple open positions, with turbo boost turned off, the robot will only ever have 1 position open at any time.
- Trade limit – this is very important as risk managing, 10 trades make 10x more profit at once but what if the price hit 10x stop loss? I prefer to set it on like 3 if I set Turbo to “yes” just to be sure my drawdown will be still low during optimisation as the main criteria.
- News manager/close on news – for now, this is very important cause sometimes leaving the news manager setting on makes memory leak on cTrader and your optimisation will hang and crash after a few days or hours. Because of that, remember to set it off and turn it on when you will use settings live.
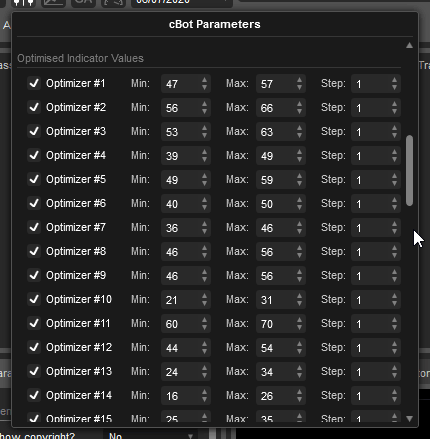
The rest of the parameters are crucial and these are basically what Neptune makes good or bad. Just make sure you are tick-checking all named “Optimizer”. You can leave their default range checks – but if you are in a hurry or on a slow machine, you can set “Step” to 2. Stepping for a higher number will make it less precise but sometimes it's enough to find very good settings. As always, it all depends on needs and situations.
Optimisation Process & Taking The Best Settings
After all this mumbo-jumbo precise clicking you can finally click Play and let it go. As we use tick data, it will take some time, some serious long time as you will see…

At first, results will not look so impressive that you would like to use them live, more like meh:
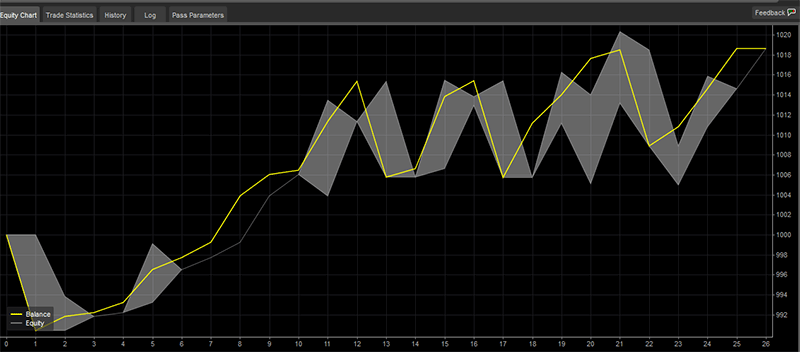
It's still in profit right? But drawdowns are crazy and would stress you totally on a live account. So let's wait some more and meantime look at what you should consider good settings. Personally, I like to sort results by fitness and then look at:

Most people just look at the Profit row of course. But pay attention to max equity drawdown, losing trades count and profit factor (which involves winning to losses ratio too), Sharpe ratio and then finally, on profit. Remember, you need to risk as low as possible so these values have to be most important for you first. And that is why we set all optimisation like this.
Finally, you will start something promising, when equity to account balance curves looks very nice, close to each other and there are no sudden bumps, like this:
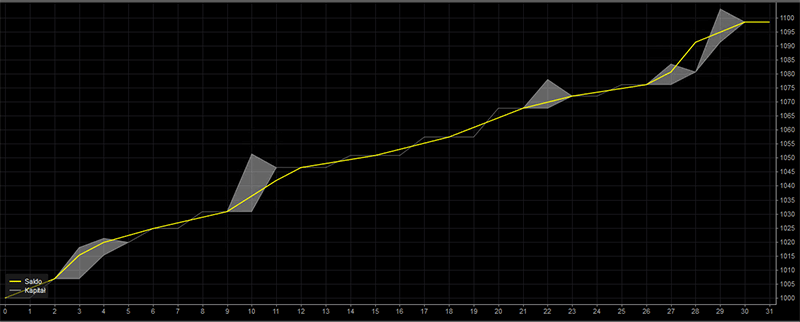
Isn’t it pretty? Wasn’t it worth making all this process super precise to get these? And the best thing is that drawdown and yearly profit basically still depends on you, of lot size and turbo count – so play a little with different settings and make max from it. Now your know-how.
Now when you are inspired, make something similar with other Neptunes as these little gems are dedicated to other pairs too!
Anyway, if all optimisation is still dark art for you or/and you don’t have a strong enough machine to handle days of optimisation on tick data – we can do it for you.
Neptune Optimisation Service
If you are having difficulties using the cTrader Optimisation Module to find a good set of parameters for your symbol or you just do not have the time or a powerful enough machine then we can do this for you.
Author: Lukasz Budny, ClickAlgo Customer with extensive knowledge of cBot optimisation using the Neptune trading system.


