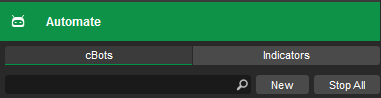
The correct method to create a new cBot is to first open the cTrader trading platform and then click on the Automate tab, this is where you will build and run your custom cBots and indicators if you need help with navigating your way around the cTrader platform follow the link below.
You can easily create a new cBot by just clicking on the NEW button, this will create a simple blank template or common code framework used with all your cBots.
Now you will see in the code editor on the right panel the source code below.
Referenced Assemblies (Libraries)
using System;
using System.Linq;
using cAlgo.API;
using cAlgo.API.Indicators;
using cAlgo.API.Internals;
using cAlgo.Indicators;
Class Attributes
An attribute is a declarative tag that is used to convey information to runtime about the behaviours of the cBot class, the attribute used with our cBot has a few options.
[Robot(TimeZone = TimeZones.UTC)]
The attribute above is the default template, the timezone that you choose, in this case, UTC will be the server time used in the robot.
[Robot(TimeZone = TimeZones.UTC, AccessRights = AccessRights.FullAccess)]
Another attribute setting for the cBot is the access rights, what this means is that when the cBot runs within cTrader how much access does the code within has on the user's machine.
An attribute is actually an object that is associated with any of these elements: Assembly, Class, Method, Delegate, Enum, Event, Field, Interface, Property and Struct.
Robot Interface Implementation
The class implements the Robot interface using the line of code below, the colon and Robot name is used. What this does is allow events that happen, some of the events are when the robot starts when the robot stops and on every price change.
public class NewcBot : Robot
It is always a good idea to change the name of your cBot and the class name to something more meaningful that has something to do with your project, if your project involved a moving average strategy, then call it Moving Average Strategy.
cBot User Defined Parameters
This is the area where you will be defining your cBot adjustable settings, you can specify only a certain data type to use, in the example below it is using a double and the name of the parameter is Parameter with a default value of 0.00.
Parameter(DefaultValue = 0.0)]
public double Parameter { get; set; }
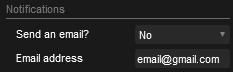
If you wish to create an email address entry and group your parameter settings you can use the keyword Group keyword, the example below shows a user setting for the cBot to allow an email address to be entered with a default value of your@email.com.
[Parameter("Email Address", DefaultValue = "your@email.com", Group = "Notifications")]
public string EmailAddress{ get; set; }
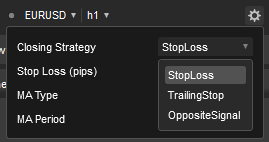
Custom Enums as DataTypes
It is also possible to define a dropdown list of options for adjustable cBots settings.
public enum ClosingStrategy
{
     StopLoss, TrailingStop, OppositeSignal
}
public class NewcBot : Robot
{
     [Parameter("Closing Strategy")]
     public ClosingStrategy ClosingStrategy { get; set; }
}
cBot Events
The basic template will capture 3 events that will occur with the cBot when it starts, stops and when the price changes, there are many other events now available.
- Further Reading on cTrader cBot Events
Build The cBot
Once you are ready you just need to build your cBot by right-clicking your mouse on the cBot in the Automate screen and choosing Build.