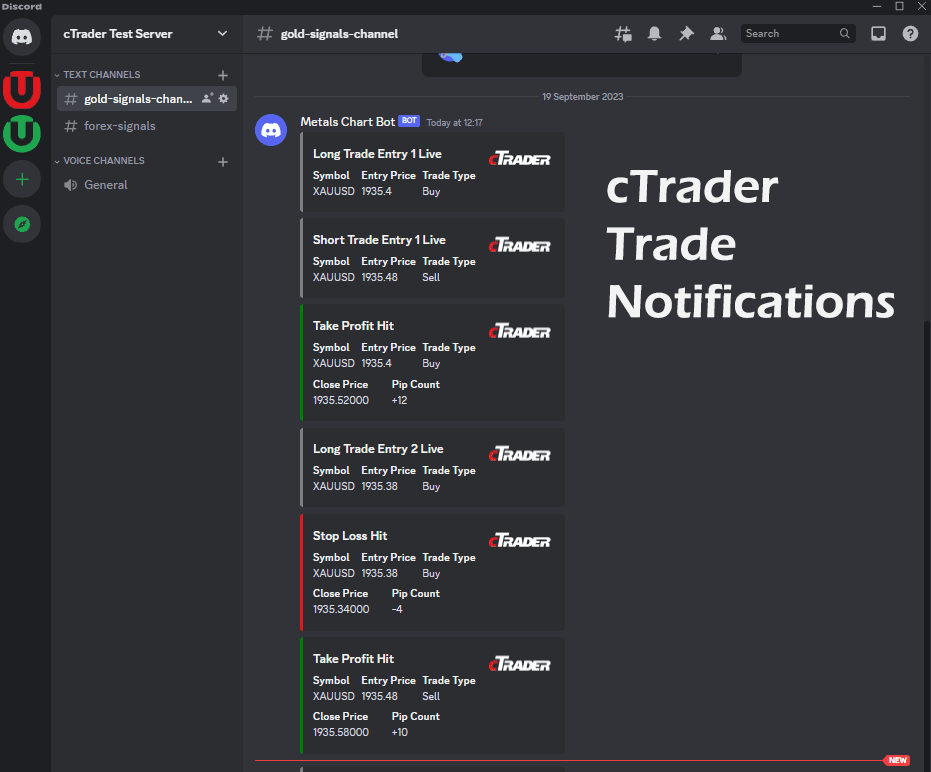
Imagine you're a Signals Provider or Day trader juggling multiple daily trades. You're also part of a Discord community where you discuss trading strategies. With the Discord Notification Indicator, you can effortlessly receive updates on your trades in real-time, right within your Discord channel. This allows you to focus on strategising with your community, rather than constantly switching back and forth between platforms.
This works with Pending Orders only!
Key Benefits:
- Real-Time Notifications: Get instant updates on your trades, directly to your Discord channel. Never miss a trade event again!
- Customisable Alerts: Tailor your notifications with customisable thumbnail URLs, making it easier to identify different types of trades at a glance.
- Event-Driven Architecture: This indicator is purely event-driven, meaning it doesn't consume unnecessary computational resources. It only activates when there's an actual trade event.
- Separate Long and Short Trade Tracking: The indicator can separately track long and short trades, providing you with a nuanced understanding of your trading strategy's performance.
- Precision: With up to 5 decimal places for close prices, you get the most accurate data for your trades.
- User-Friendly: Easy to set up and integrate with your existing cTrader platform. No technical skills are required!
- Secure: Operates with full access rights, ensuring that your data is securely transmitted.
- Trial Period: Why not try this indicator with a 14–day FREE trial? You get unlimited access to all features!

Discord Trade Signal Events
Don't miss out on this game-changing tool. Take control of your trading experience today with the Discord Notification Indicator
- Long Trade Entry 1 Live: The first long trade has been entered.
- Long Trade Entry 2 Live: The second long trade has been entered.
- Short Trade Entry 1 Live: The first short trade has been entered.
- Short Trade Entry 2 Live: The second short trade has been entered.
- Break Even Taken: The trade has broken even.
- Take Profit Hit: The take profit level has been reached.
- Stop Loss Hit: The stop loss level has been reached.
What is Discord?
Discord is a popular communication platform designed for creating communities, hosting discussions, and facilitating real-time communication, primarily in the form of text, voice, and video chat. It was initially developed for gamers but has since evolved into a versatile tool used by a wide range of communities, including Forex and day traders. It has gained popularity due to its user-friendly interface, versatility, and ability to bring people together in virtual communities.

How to Configure the Discord Notification Indicator
Software Requirements
- cAlgo Trading Platform: This indicator is specifically designed for cAlgo. Make sure you have this software installed.
- Discord Account: You will need a Discord account and a server to send notifications to.
Initial Setup
- Install cTrader: If you haven't installed it yet, download and install the cTrader trading platform from its official website.
- Set up Discord Server and Webhook: Create a Discord server or use an existing one to set up a Webhook. Copy the Webhook URL as you will need it to set up the indicator. Instructions on how to set up a Discord server can be found XXXXXXX
- Install the Indicator: Download and install the Discord Notification Indicator on your cTrader platform.
- Configure Parameters:
- Enter Webhook URL: Paste your Discord Webhook URL into the Discord Webhook URL
- Thumbnail URL (Optional): Paste the URL of the image you want to be displayed as a thumbnail in Discord notifications.
Events it will Output
- Trade Entry: When a pending order gets filled, the bot notifies you whether it's a long or short trade and whether it's the first or second entry.
- Trade Exit: Upon the closure of a position, the bot will notify if it was a Take Profit or Stop Loss.
- Break-even: If a trade is closed at or around the entry point, the bot will send a "Break Even Taken" notification.
- Please note: The above events will only trigger from a ‘Pending Trade’. Live trades will not notify Discord, but the closure of those trades will.
Do's and Don'ts
Do's
- Use Accurate Webhook: Always make sure that your Discord Webhook URL is correct.
- Check the Logs: If you see a message on the chart like "Your Trial Has Expired - Check Log," check the cAlgo logs for more information.
Don'ts
- Don't Share Your Webhook URL: Keep your Discord Webhook URL private. Anyone with access to the Webhook URL can post messages to your Discord server.
- If access is granted, Don't Modify the Core Code: Unless you know what you are doing, avoid changing the core functionalities of the code, as it may result in the indicator not working as expected.
By following these guidelines and understanding the events, you can make the most out of the Discord Notification Indicator.

How to Set Up a Discord Server
User Guide: Setting Up a Discord Server and Enabling Webhooks on Channels
Creating a Discord server and enabling webhooks on its channels can greatly enhance the way you communicate and interact with your community. This guide aims to take you through the process, step-by-step, in a comprehensive manner.
Creating a Discord Server
- Download and Install Discord: If you haven't already, download Discord from their official website and install it.
- Create an Account: Sign up for a Discord account if you don't already have one.
- Start Discord and Log In: Open Discord and log in with your account credentials.
- Create a Server: Click the '+' icon on the left sidebar, then select 'Create a server'. Fill in the necessary details such as server name and region. Click 'Create'.
Setting Up Channels
- Open Your Server: Click on your server icon on the left sidebar.
- Add a Channel: Click on the '+' icon next to the 'Text Channels' or 'Voice Channels' section to add a new channel.
- Channel Settings: Name your channel and set the appropriate permissions.
Setting up Roles and Permissions
- Server Settings: Click on the server name at the top left, then select 'Server Settings'.
- Roles: Click on 'Roles', then 'Create Role'.
- Configure Role: Name the role and configure permissions. You can set up who can manage webhooks here.
- Assign Roles: Go back to your server and right-click on a user's name. Select 'Roles' and assign the newly created role.
Enabling Webhooks
- Channel Settings: Right-click on the channel where you want to enable webhooks and choose 'Edit Channel'.
- Webhooks Option: Navigate to the 'Webhooks' tab on the left sidebar.
- Create Webhook: Click 'New Webhook'.
- Configure Webhook: Name your webhook and choose the channel where it will post messages. You'll see a Webhook URL generated; keep this safe.
- Save: Click 'Save'.
Additional Tips
- Use role permissions wisely to restrict who can create and manage webhooks.
- Webhooks can be integrated with various third-party services like GitHub, Trello, and many others for automatic updates.
And there you have it, a Discord server with channels that can utilise webhooks.
User Guide Video Tutorial
Watch the following video tutorial that will guide you through the process of setting everything up.

How To Install & Remove
First, make sure you have the cTrader trading platform installed and then simply unzip the file and double-click on it to automatically install it onto the platform. The file that is installed can be found in your indicators folder.
Any Questions?
If you have any questions, please first search our product help forum for the answer, if you cannot find it, post a new question.
Need a Broker
If you are still looking for a broker you can trust, take a look at our best cTrader broker site.


